Category Archives: News

Topical news items/ announcements

Cello build #3

Having just retired I recently started my 3rd cello build.  I think this is going to be a real pleasure as I no longer need to burn the candle at both ends to find time for the luthiery.

The mold

I started by building a new mold that I can leave in place whlle rough fitting the back and belly to enable the overhang on the edges to be set really accurately. It is designed so that it can be taken out easily after the linings have been fitted.

Inner part of new cello mold
New cello mold bolted up

The ribs

I cut blocks from willow for the corners and spruce for the ends and glued into the mold before shaping with chisels and files.

Blocks glued into mold
Blocks carved to shape

Then I scraped the ribs and sanded down to 1.4mm on the drum sander before cutting to size, bending and glueing to the blocks.

Gluing in the c-bout ribs

Then I could remove the outer parts of the mold to fit the linings which I mitred into the corner blocks.

Top section of mold removed to allow fitting of linings
Linings fitted

The plates

I had some lovely pieces of book-matched spruce and maple from David Dyke which I cleaned up and carefully planed the edge square and true.  This takes a lot of time (for me) to ensure an absolutely perfect fit ready for the rubbed joints.  Once dry I then flattened the back surface with the jack plane.

Book-matched back planed flat

Then I used the rib assembly to mark out the outline on each plate allowing 3mm of overhang (using a pencil and washer) before cutting out on the bandsaw.  (Post build note – should be more like 4.5mm).

Then onto the lengthy process of carving the outside profile of the plates.

Rough shaping of the back with a chisel
Top after starting to rout shelf all round the edge
Back after starting to rout shelf all round the edge

Once the plates outer profile had been carved to match the templates I assembled the plates onto the ribs (with the form still in place) and then used a file with a 3mm wood off-cut attached to file the overhangs to an exact 3mm all round and also set the final rib thicknesses (5.2mm on the back and 5.6mm on the belly).

Plates temporarily assembled onto ribs and overhang set ready to do purfling

Then I marked the purfling channels set in 5mm from the edge and cut out using a scalpel and a fine chisel.

Purfling glued in on back plate
Purfling channel cut and faired in to back profile

Next I dismantled the back and front plates from the rib assembly ready to carve out the inside profiles. 

To make this quicker I first drilled holes to a depth a few mm shy of the finished thicknesses.

Back plate drilled to give rough thicknesses

Then a lot of elbow grease with first gouges and then thumb planes to get to the starting profile where I start exciting the plates with a loudspeaker coupled to a variable frequency oscillator.

It turned out that the spruce for top had a very low transversal thickness making it very difficult to maintain the x-mode frequency.  I ended up having to fix a patch using some wood from a good stiff guitar top to bolster the transversal stiffness and even after that I had to accept an x-mode frequency more than an octave below the ring mode. This meant trying to keep the back’s ring mode about a semitone higher.

Final tuning was done after cutting the f-holes and fitting the bass bar to the top.

Gluing on the bass bar

I ended up with the following mode frequencies and plate weights:

  Mode 1 Mode 2 (x-mode) Mode 5 (ring mode) Weight
Top 26.5Hz 52.6Hz 119Hz  (A3 +36cents 488g
Back 31.2Hz 63.2Hz 127.5Hz (B3 +55cents) 785g

Assembling the box

I started by roughly trimming the ends of the blocks before gluing the back on carefully. This was much easier with the rib form still in place.

Gluing on the back

Then I removed the collapsible rib form, finished shaping the blocks and drilled the pilot hole for the endpin.

Corner and end blocks shaped and inside cleaned up ready to glue on top plate

Finally I glued on the top plate which fitted pretty well.

The neck & fingerboard

Firstly I planed and scraped the fingerboard blank to size and set the string relief to half the diameter of the strings.

For the neck, I started by squaring up the maple blank and carefully marking the outline in pencil. I had previously made a template from perspex to make this easier – particularly for the scroll where I marked through guide holes with a pin.

Squared up maple neck block marked up ready for cutting on bandsaw

Then I used the bandsaw to cut out the outline shape and a handsaw to cut down the neck which I then trued up with rasps and files.

Cleaning up the rough outline of the neck

While the scroll was still a square block I drilled the pilot holes for the pegs and then cut the scroll-box cheeks with the bandsaw.

Cutting the cheeks on the bandsaw

Then I sawed the scroll profile a segment at a time before using gouges and scrapers to reach the finished shape.

Sawing the scroll outline
Scroll nearly done


Assembling the box

Before shaping the heel I temporarily glued on the fingerboard and fitted the neck joint using chalk and going slowly so that I achieved:

  • A fingerboard projection at the bridge of 83mm
  • An up-stand of 23mm
  • A neck stop of 280mm

This is probably the trickiest bit and absolutely key to playability so worth spending the time to get it right.

Having fitted the neck joint I than shaped the heel and neck with rasps, files and sandpaper before gluing up the neck joint.

Getting ready to glue on the neck
Neck glued on

Then I trimmed up the heel, cleaned up any surplus glue and sanded down the whole instrument with 600 grade emery paper. Then I wetted the whole instrument to raise the grain and sanded again ready for finishing.

Cleaned up and ready to go in the fuming cabinet

Finishing

I started by darkening the instrument with a few days in the fume cupboard with a bowl of ammonia and then sealed with a few coats of shellac, rubbed down with 600 grade and then a final shellac coat.

After sealing with 2 coats of shellac

Then I mixed some artist paints (2 parts burnt sienna, 1 part burnt umber and 1 part alizarin crimson) with a few drops of linseed oil and rubbed in evenly with a rag.

After 1st application of artist colours

Following drying in the UV cabinet the colour was way too light so I repeated the exercise and then gave it its first coat of colour varnish. The back is looking particularly pleasing.

After 1st coat of colour varnish


The colour is still a bit on the light side so I gave it another coat of artists colours with more burnt umber and less red and then another coat of varnish.

After more artist colour and another coat of varnish
After some more artists colours and another coat of varnish

Then I left it in the UV cabinet for 2 weeks before cutting back, polishing and finishing with a wiped on coat of linseed oil.

Then I re-fitted the fingerboard and finished the neck with a couple of thin coats of linseed oil and burnt sienna artists colours burnished to a good shine.

Gluing fingerboard back on cello #3

Then I shaped and fitted the saddle, nut and bridge before stringing up with a set of larsens.

Finished Instrument

The finished instrument weighs in at 2940g, sounds wonderful

With Larsens

With C/G Spirocores

and looks like this:

Cello #3 front view
Cello #3 back view


Cello #3 side view
Cello #3 ff holes
Cello #3 peg pox
Cello # 3 scroll

Violin week 8 – Setup

Now the instrument is basically finished it is time to set it up and hear how it sounds.

Fitting the Violin pegs

Having already shaved down the pegs to match the taper on my peg-hole reamer, I smoothed them with 600 grade emery paper and gave a light wipe-on coat of finishing oil and then burnished with wire wool.

The peg-holes were then reamed out carefully so the distance from the peg-box to thumb-piece was 16 mm. In order hold the pegs I built a simple jig to hold them while they were drilled with a 1.3 mm bit for the string holes and then lightly chamfered the edges of the holes. 

Simple jig to hold peg while drilling the string hole

The outside of the peg was marked where it protruded from the peg box and I carefully sawed off the excess using the same jig to hold the peg. Finally I rounded the end with files and 600 grade emery paper.

Fitting the Violin Nut

The Evah Pirazzi medium gauge violin strings I am fitting have diameters of 0.8, 0.66, 0.66, 0.21 mm

So to have string height above fingerboard of 0.5, 0.45, 0.4, 0.35 mm and slots 1/3 of diameter of string the nut height should be:

0.76, 0.67, 0.62, 0.42 mm

I marked the ebony nut against the end of the fingerboard and then filed down to give a 1 mm step and faired in nicely to the sides and entry to the peg-box.  Once smoothed with 600 grade and wire wool the nut was lightly glued to the end of the fingerboard.  I adjusted the step from 0.8 to 0.5 mm before marking the string positions using a sharp knife. I set the strings with 5.5 mm between centres and the E string 8 mm from the centre line.  This gives slightly more room for the E string than the G . The knife marks were then widened first with a triangular file and then with nut files.

The last step was to file the top of the nut down so that the slots only held 1/3 string and then finished with emery paper and wire wool.

Fitting the Violin Bridge

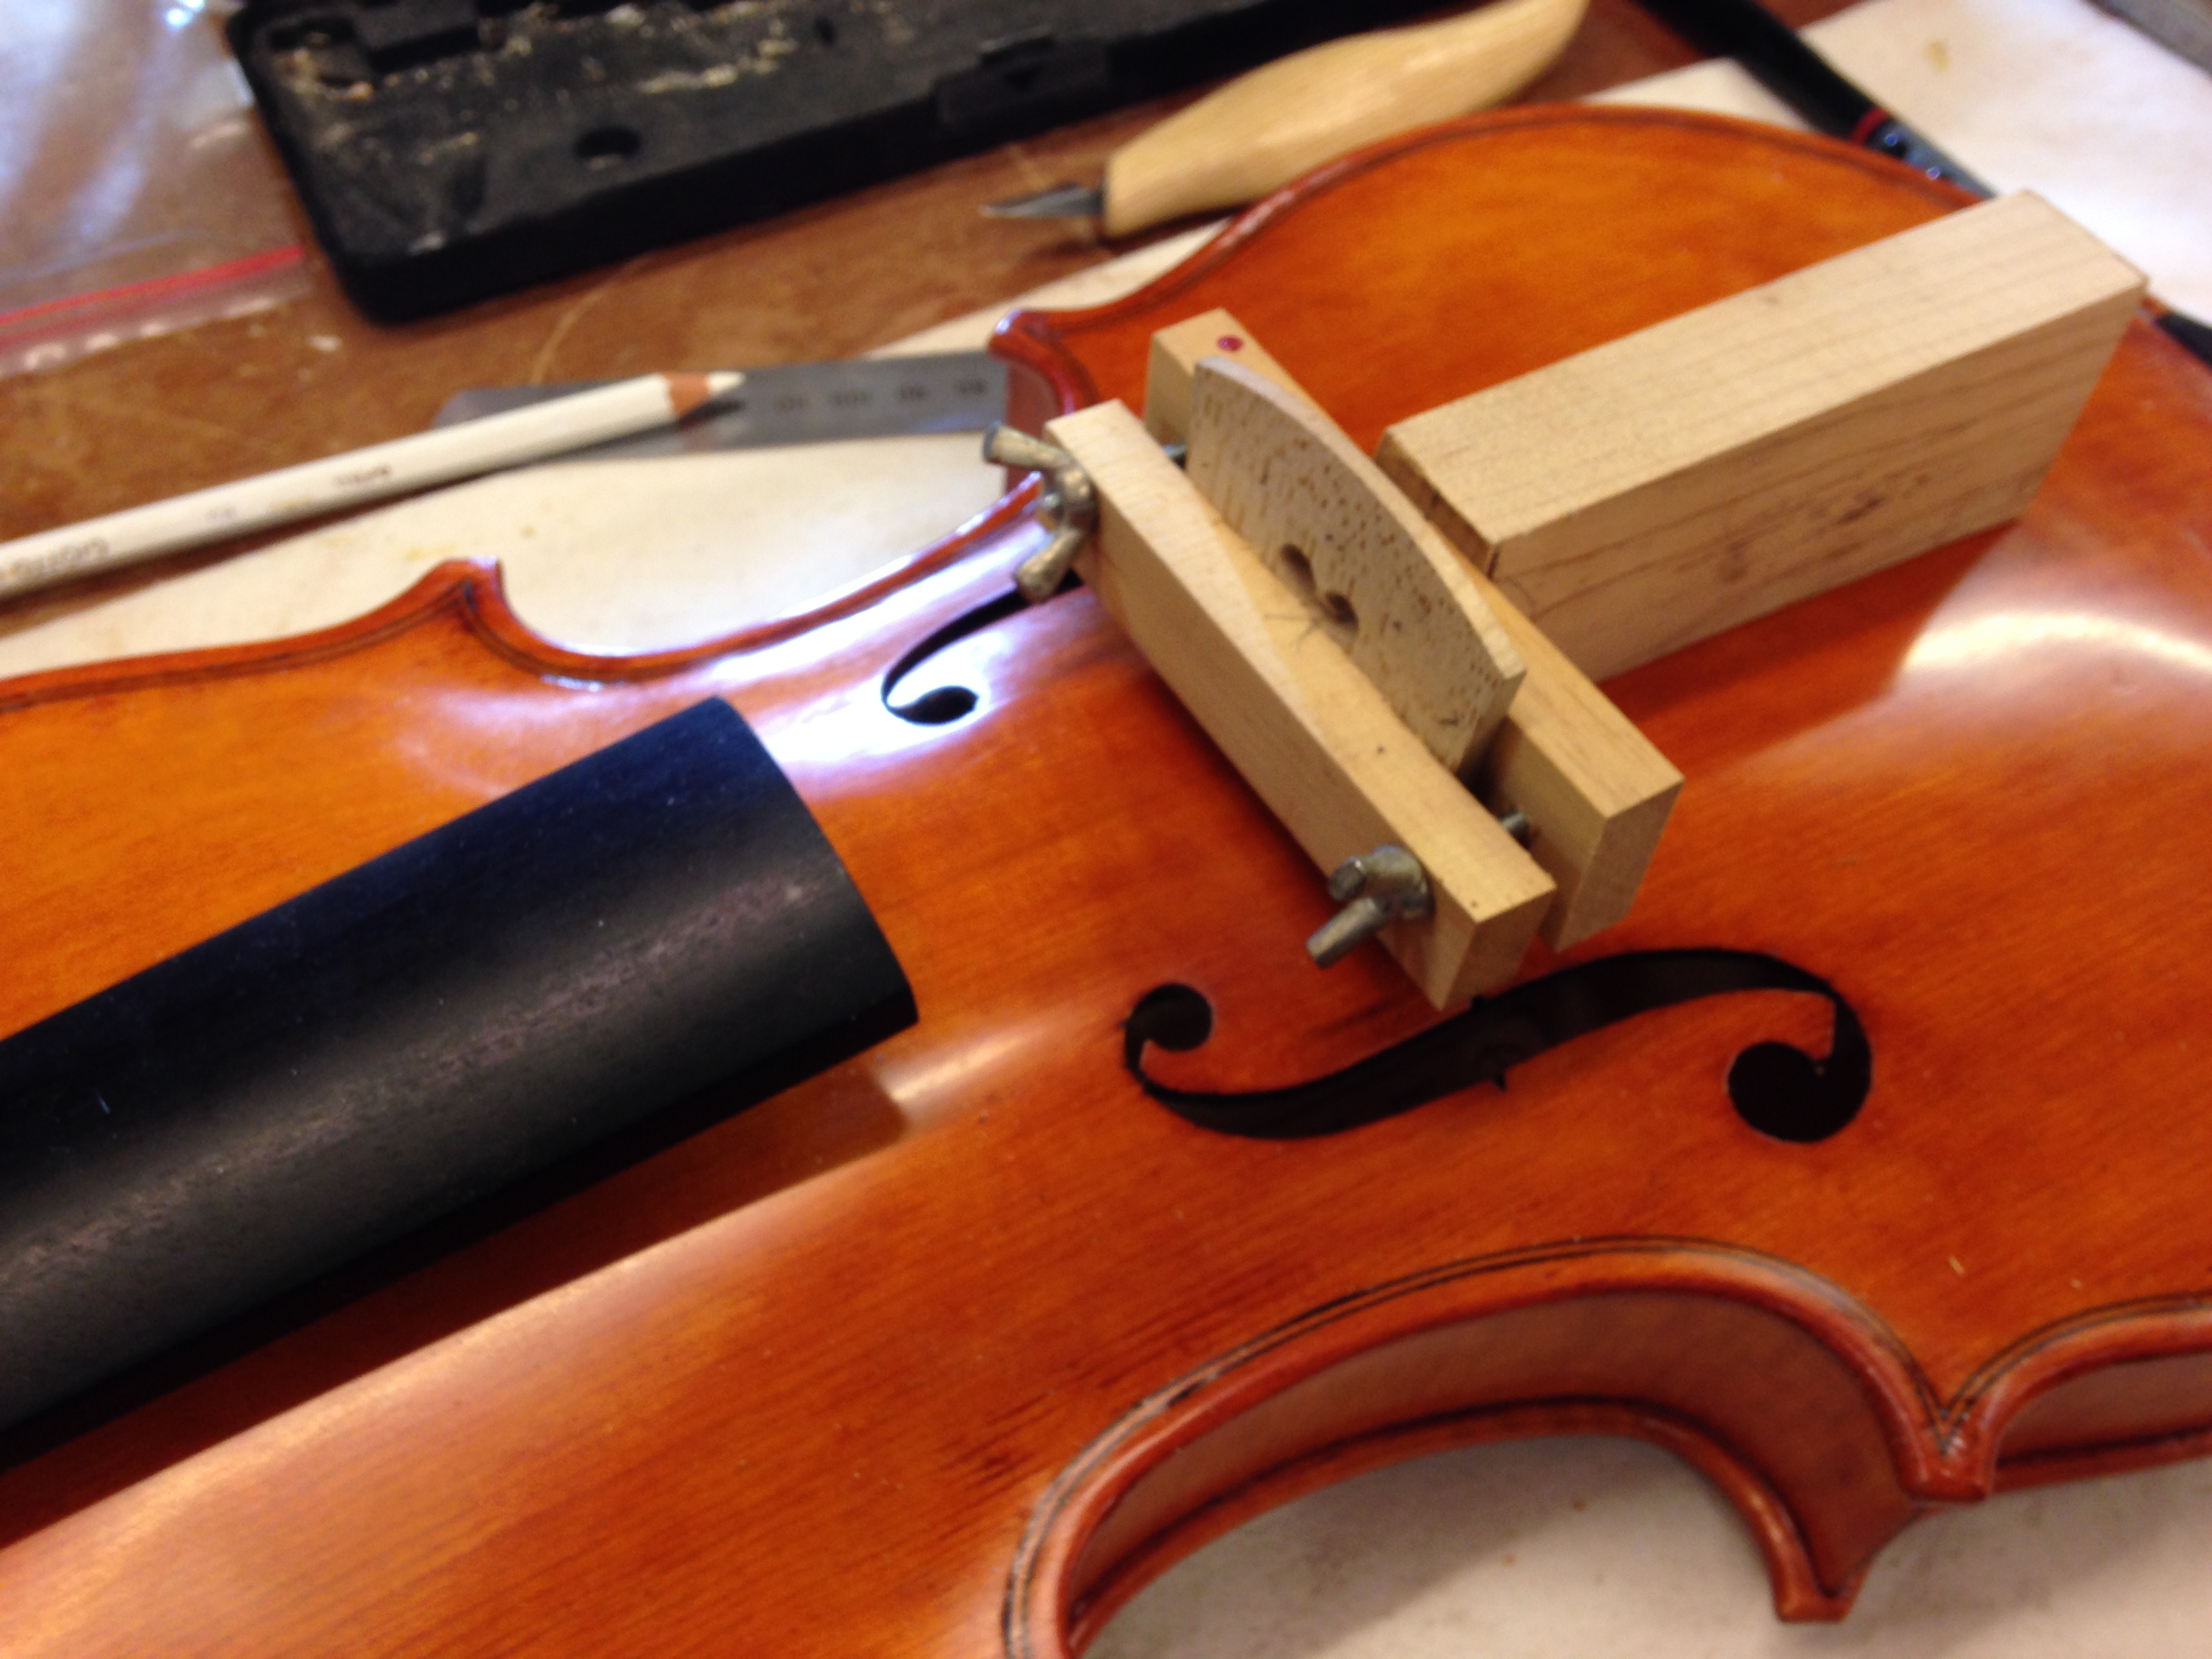
Starting with an Aubert Miracourt blank I followed the fitting guidelines in this very good article on how to fit a bridge by Lars Kismer. I built a simple jig to hold the bridge perpendicular to the top.

Simple jig to hold the bridge

Fingerboard projections were marked on the bridge and action marked at 2.5 mm on the E string up to 5 mm on the G string and joined with a curve of 41 mm radius.  I purchased a banjo head made of goat’s skin on e-bay which provides perfect parchment material for reinforcing the E-String notch. 

Setting the After String Length (ASL)

The violin tailpiece gut was adjusted to make the ASL approx 1/6 of the string length and then fine-tuned so that the after string tuning on the G string was an octave and a fifth below the D string.

Scroll
Scroll
Pegbox
Side view
Back
Front

The finished violin (without chin-rest) weighs in at 420 g.

Fitting the Violin chin-rest

I settled on a Kreddle chinrest as the client specifically wanted something high.  The Kreddle provides plenty of adjustment flexibility in this regard and came highly recommended. I also found it extremely easy to fit and adjust.

On first play of the finished violin, the G and D strings have a lovely rich sound and the E is strong and sweet but the A ran out of steam a bit at F.  Opening up the heart on the bridge a little and tuning the B0 resonance to the A0 body resonance by putting a small piece of Plasticine under the end of the fingerboard made a big improvement.

Delivered to my client yesterday at Orchestra who was delighted with it – brilliant timing too as we had the fabulous violinist Sarah Sew working with us on the Elgar violin concerto and she was kind enough to give it a workout. Her verdict : ” it works – I mean it really works and powerful too”. Sarah also said it compared very favourably to many new build professional instruments (she tries out a lot of them) but found it a little on the  “chunky” side compared to her wonderful Italian Gagliano – so not really a surprise as that is actually quite a small instrument.  Clearly I will have to work on making my next violin a bit “finer”.

Previous

Anna recorded by Tony Iommi

My good friend, recording engineer and cellist George Shilling was recently involved with Tony Iommi’s latest creative work with the Birmingham Gospel Choir called “How good it is” where George and Anna provided the cello accompaniment.

Birmingham post article complete with  video is here


Profitable visit to David Dyke

Just got back from another expensive but most profitable  visit to David Dyke down near the South coast.  Came back with the boot loaded up with enough wood for the next cello and my first violin.

New load of wood for cello #3 and first violin

Spent this morning doing the design for the violin inside mold using  the solvespace parametric drawing package again.

I have decided to do a blog of the violin making process like I did for the cello so that interested parties can follow the progress as well as providing me with a reminder of what I did!

The first instalment is here.


Cello No.2 – Beryl – Completed

I finally completed my second effort at cello making and delivered the finished instrument to George (who christened her “Beryl”)  just in time to play the Stratford Symphony’s summer concert.

Here are a few recordings made at George’s Bank Cottage studio:

And a set of pictures of the finished instrument kindly taken by George .

A complete pictorial record of Beryl’s 6 month build process can also be found here.

New cello ‘Anna’ recorded

I just got back from an exciting afternoon with my good friend George Shilling at his Bank Cottage recording studio in the Cotswolds. George kindly spent some time recording my new cello “Anna” (after a visit to the pub).

You can find the resulting pictures and recordings here.

Guitar #5 Completed

Just finished stringing up #5 – my first own design classical guitar.


Guitar #5
Rosewood bridge
Guitar #5
Heel detail


guitar #5
Crossbow motif on head


guitar #5
Rosewood back with cocobolo centre strip


guitar #5
Cocobolo bandings


guitar #5
Own design rosette


Here is my comedy attempt at Lagrima!

And here is the Weiss Fantasie:

Visit to Miles Kent

Having spent many many hours browsing the Kent guitars site in the past I decided to take the opportunity to visit Miles Kent at his place in Sevenoaks as I was going to be in the area looking for guitar wood.

Miles was most welcoming and he was kind enough to spare an hour or so looking at and playing some of the instruments I have made and provided me with great encouragement to persevere as well some extremely helpful and practical advice on the guitar characteristics that were often important.

I came away with greater insight as to the whys and hows of the differences in my instruments, encouraged by how wonderful Miles made them sound and inspired to try a more popular design than the Ramirez 1a on my next guitar and in a more conventional 650mm scale length.